Thursday 6 May 2010

Evaluation of Pop Promotional Package

1. In what ways does your media product use, develop or challenge forms and conventions of real media products?

When we first started to research typical music promotional videos in our class, we focused on the contrasts between Rap and Hip Hop videos to Rock videos. I noticed that the majority of them were very stylised according to their music genre. As I have researched, the band Massive Attack tried to be different but intelligently different from other bands. Strange narratives and unusual cinematography contrast with videos of bands like AC/DC who make videos based around performance rather than a narrative, with a live crowd.

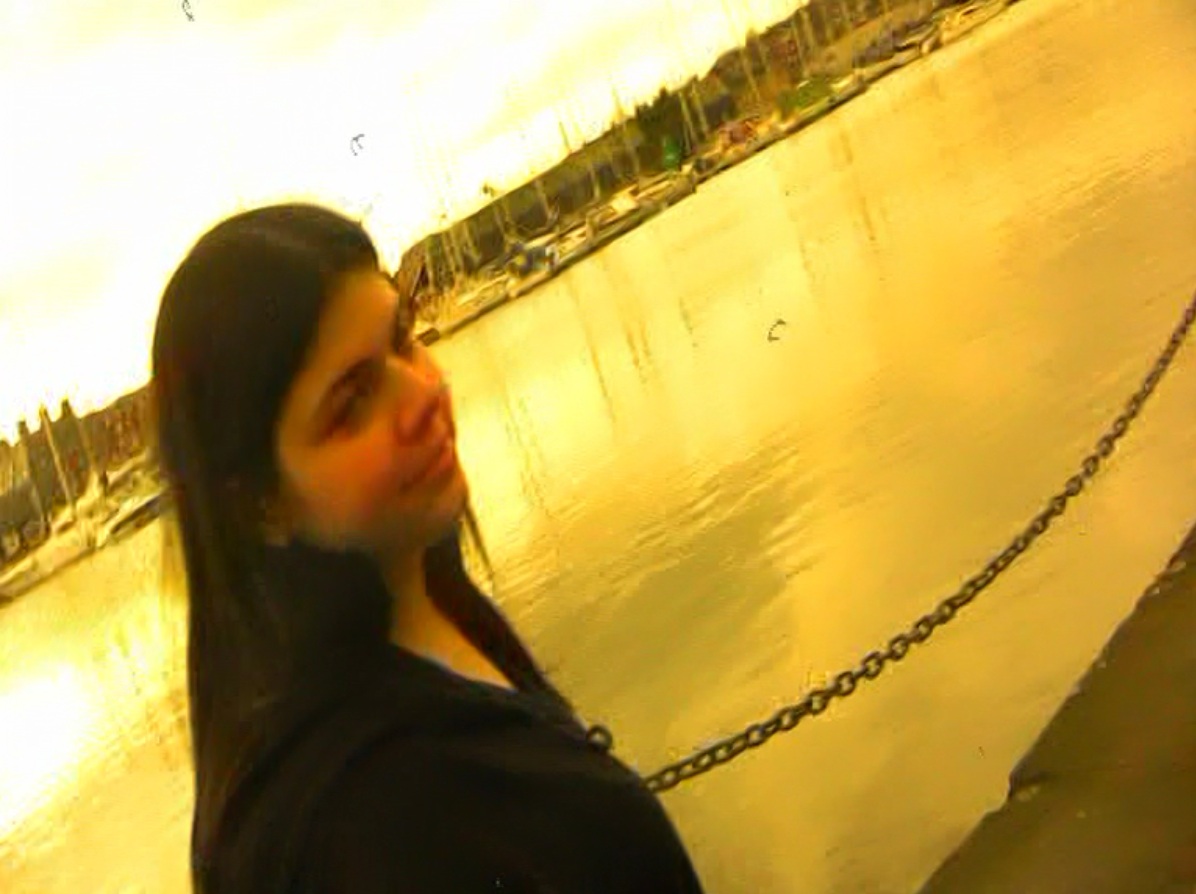
After analysing three Noah and the Whale music promotional videos, I can confidently suggest that their videos have 'quirky' effects and storylines, with a little teenage humour added in "Shape Of My Heart", a narrative which tries to follow the lyrics in "2 Bodies 1 Heart" and "5 Years Time", and some scenes from their film The First Days of Spring in the video "Blue Skies". We tried to follow the conventions of music video filmmaking that Noah and the Whale had used, adding a light-hearted but also strange and dark narrative to our version of "5 Years Time".

As Josh has clevely stated on his Blog, we aimed to create a "finished music video which combines style and quiet sophistication – there is a storyline that is about heartbreak". We used a Super 8mm Effect to give the flashbacks more of a home movie feel with occasionally chaotic camera work, therefore sticking to Noah and the Whale's 'quirky' effects.

Noah and the Whale are known by their fans as a British, Indie Nu-Folk band, therefore their videos have to relate in some way to the Indie and Folk genres. Since they are a newer folk band, relating in some ways to how they have been described as a 'Nu-Folk' band, we decided that by analyzing their videos and noting some of the techniques they'd used, such as a traditional old film look or the Super 8mm Effect, we would try to imitate as best as possible the Super 8mm old film effect in Post-Production to keep to the traditions of Noah and the Whale music promotional videos.

I think our video for 5 Years Time follows conventions and stylistics of contemporary music promtional videos and especially as set out in Noah and the Whale's videos, such as a happy mood or the sometimes quirky narrative. The narrative of our video consists of a relationship between a boy and a girl, but the relationship was in the past and therefore the main purpose of the video is to show the memories he has of the happy times together.

There is no real gain from just producing any old video which either copies the conventions or manipulates the point of the task, by producing a similar narrative to that seen in the original video by the group themselves. Therefore, to create a realistic state of originality in ideas, camerawork and narrative, we adopted some of the techniques we had used last year in our Film Noirs, such as the Film-Noir specific "Dutch Tilt" for the handheld, home movie-styled, flashback shots. The combination of the adoption of Film-Noir specific conventions and those conventions normally used in both traditional and contemporary music promotional videos therefore created for us the ideological set up and verisimilitude for a music video, in terms of Mise-En-Scene, Cinematography, and Editing and transitions.


2. How effective is the combination of your main product and ancillary texts?

(ABOVE IS EMILY'S INITIAL IDEA FOR A CD/DVD DIGIPAK COVER)

We were initially asked to analyse a Promotional Package to get us thinking about Posters and CD Covers/DigiPak ideas and designs. I had analysed Mika's The Boy Who Knew Too Much, looking at how a theme was kept closely linked between the Print Ad (poster) and CD Cover. From here, as a group we each selected three different Noah and the Whale CD covers and Posters to analyse. The three Covers I had analysed were the E-Single of 5 Years Time, CD Album Peaceful, the World Lays Me Down, and CD Album The First Days Of Spring. I noted how they were stylised according to the videos for the songs on each of the CDs. Based on this initial and development of group ideas, we tried to follow the conventions of Posters and DigiPaks/CD Covers that Noah and the Whale had used, adding our own personal touch to our version of a DigiPak and Print Ad for "5 Years Time".

ABOVE IS A POWERPOINT PRESENTATION WHICH I PREPARED FOR CLASS BUT NEVER REALLY SHOWED TO OUR CLASS. IT IS A PRESENTATION TO VIDEO COVERSION, USING VIDEO CONVERSION SOFTWARE FROM THE INTERNET.

The Promotional Package that I created with my group consisted of a music promotional video, a CD DigiPak Cover, and a Promotional Poster (Print Ad). The purpose of the package was to plan, film and edit a video for a chosen song (“5 Years Time” by Noah and the Whale), and then design two ancillary texts based around the video, the song and the artist. Whilst Josh edited the video in Post-Production, I set about researching the Super 8mm old film effect we had discussed using on the internet, and experimenting around with a few shots from the main video I created the basis effect for the flashback moments in our video narrative. Whilst Josh and I were editing, Emily researched Noah and the Whale’s previous CD and Poster campaigns, and then started creating some basic designs for us as a group to discuss. After discussion, we tried to keep a theme running through all three products in the Promotional Package. I created screenshot photographs of the video so that Emily could insert these images onto the designs for the CD DigiPak and the Poster. We wanted to use a shot of me and Emily in the tennis courts on the front cover of the CD DigiPak and in a similar sort of way on the Poster.


Referring to Feedback we received on all three texts and their interrelationships from our Media class, our video was good but needed improvements here and there, but the CD DigiPak looked too amateurish and novice, with four random images on the four-sided DigiPak Cover, and therefore made the three texts look completely random with no real relationship. We were trying to represent the happiness between the boy and the girl characters in the video on the CD covers and Poster, using a screenshot image of them in the tennis courts. Unfortunately, our idea didn’t quite work as the CD was too colourful with the yellow inside the DigiPak rather than on the outside, where it should have been placed. Four Polaroid-style photographs would have been better, therefore adding to the themes set out by the video. The Poster didn’t link with the CD Covers because I had insisted on putting the tennis courts photograph in the background with the text (reviews, release dates of album etc.) on top in red with a black outline. With the representation of happiness on the poster and CD Covers, we tried to show that the ideological message and values behind the tennis courts photograph was that happiness is everything when you have it but isn’t when you are not in happiness, which relates to the death or splitting-up of the girl from the boy.

3. What have you learned from your audience feedback?
POP PROMO:

Having researched Noah and the Whale and their current fan base, our target audience remained as fans of British Indie and Folk music genres, especially ‘Nu-Folk’, which would be mostly teenagers and young people; therefore we knew how to aim our video at this audience with fashionable and recognizable narratives.

Once we had completed the final edit, it was showcased to the rest of the students in our Media Studies class. Their initial impression was that they really liked the video, the things my character did in both timescales and my ‘larking around’, Emily’s performance looked natural, the video contained an understandable narrative, the characters really shined through, the squirrels and ducks were popular with the girls because of our expert photography and camerawork but mostly because of the cuteness of the animals, and they really liked the mirror of the two timescales reflecting a sense of playfulness. They also liked the Super 8mm Effect, which showed the ingenuity and authenticity of the performance in the flashbacks.

However, they wanted more Close-ups of me, they didn’t like the titles (even though they admitted some bands did this in the 1980s-1990s) and wanted them removed as they were too cheesy, the Establishing Shots of the yachts in the Ipswich Waterfront Marina reminded one viewer of the opening title sequence to Children’s TV programme Rosie & Jim (which could be intertextuality if we kept these scenes), the whiteness at the end of the video could have been a little more ghostly to reflect the death of the girl, there were bags in the corner of one shot (I picked up on this) in the tennis courts when Emily throws the tennis ball, and there was some confusion as to how the narrative finished. After I had explained that the girl had died accidentally and tragically, they understood the narrative better, but thought that her death was possibly a step too far and too much of a contrast to the happy, light-hearted mood to the video narrative and lyrics.

In terms of Cinematography, my innovative and incredibly creative 360 degree, handheld circular spinning shot of Emily proved to be a success with our initial viewers, which was a big relief, as I was simply trying new shots here and there at random when on set. The general mix of nicely framed and handheld shots worked well, but some of the shots of me weren’t very good, such as the shot where I throw the ball up in the air, where only the tip of my head and a bit of my eyes are seen.

Our initial viewing audience seemed happy with the Mise-En-Scene aspects of our video, stating a good use of location & costume, the wintry weather worked well in the sad present-tense shots; and the flashbacks look like summer because of the performance contained within these shots and the general use of location and props and park animals to reflect that happy nature.

The yellow interpretation of the classic Super 8mm Effect impressed our class, who said it looked realistic, even though it wasn’t, as Final Cut Pro didn’t have the effect installed as part of the main software package, and thus we had to recreate the typical effects simulated in the Super 8mm Effect. The whiteness at the end was good, even though it could have been better with a more ghostly look and feel, and the rhythm and general pace of the video was almost perfect, as it was mostly in-sync and in time with the beats of the song.

In terms of the suitability of the visuals to the music and lyrics, the general narrative could have been happier, and we could have included a few shots of the band or the characters singing along to the lyrics. One viewer mentioned how the narrative could have been a little bit more literal mid-song to match the lyrics, but overall the video met the requirements of our fellow classmates of an Indie Folk music promotional video.

Responding to the Brief that was initially set at the beginning of the year, we seemed to have done the job, but possibly could have squeezed a few shots of the band somewhere on the timeline. There should have been a few more shots of me, and generally me and Emily together, in relation to production values and technical ability. Our fellow classmates said that the video suited the genre of music and if aimed at them (target audience) they would be happy to watch it, and in terms of creating representations of a band or artist, or creating a bands or artist image, they responded to our video by saying that Noah and the Whale’s music seemed to be happy, bouncy and bittersweet.


CD COVER & DIGIPAK:
In terms of the other two ancillary texts, however, our fellow classmates did not like the designs at all. There seemed to be no good areas, just a lot of weak areas and concerns. On the CD cover, the four images used were too contrasting and too random; the ducks under the CD placement holder were too blurred, the colours and styles of typeface (font) used looked too amateur, and the yellow image on the inside was not liked as it was also too amateurish. The front cover seemed to be ‘cheap’ (stretched), and should have been brighter to add emphasis to this part of the whole four-sided CD cover. The images were too contrasting, and four Polaroid-style photographs or images would have been better. Basically, fonts & typography were cheap and colours were used too much.

Therefore, in conclusion, I can honestly say that there seemed to be no real suitability and combination of all three promotional package elements for the target audience, according to our class, who would have been the most suitable target audience. The video worked well, but the themes used in the video were not effectively continued on the CD DigiPak covers or the Poster Print Advertisement.

4. How did you use media technologies in the research and planning, construction, and evaluation stages? (Significance of using these technologies)

In pre-production process, I focused my efforts on creating a Blog (Weblog) on the Internet for recording my progress and my group’s initial progress in the research and planning stages. The Blog served as a source not only to record progress but also as a daily journal, where I recorded events that happened that were relevant to the project, such as disasters with weather conditions, which couldn’t have been helped. It was also my main source for uploading Storyboard drawings, the Storyboards Animatic video and initial edits (with links to my YouTube Channel).

I used a home editing software package on my PC at home to create a Storyboards Animatic. The software I used was Microsoft Windows Movie Maker, which comes as standard on the Microsoft Windows XP Home Edition Operating System. I had used this for last year’s Animatic when doing the Film Noir, so I knew how to use the software and knew how to use it effectively.

During the filming and editing of last year’s project (Film Noir), I had set up a YouTube Channel to post videos and then link to these via my Blog. I used my YouTube Channel once again this year during the capturing of footage to record and post Outtakes, Test Footage, the Storyboards Animatic and initial edits.

This year was similar to last year in terms of technology used in the production of our music promotional video; therefore no extra time-wasting training was needed. We used a Canon Mini DV-1 Tape Camcorder, with Mini DV Tapes and DV-1 Camcorder Batteries, and a Tripod system for use with the camcorder. We did not require microphones or sound boosters as the sound which we would need would be non-diegetic (music) and therefore no sound was required from the characters in terms of exchanging lines of dialogue. Thus, we proceeded ahead with the filming with the simple built-in microphone of the Camcorder. We decided to use the Camcorder handheld for the flashback shots to deliberately have shaky handheld movements to reflect the happiness felt through the memories and flashbacks, therefore separating the camcorder from the tripod for handheld usage.

(ABOVE: MY EVALUATIVE DVD VIDEO VOICEOVER COMMENTARY)
After filming and capturing our footage we concentrated our main efforts on learning how to use the new Final Cut Pro video editing software in the Apple iMac Editing Suite. We started by editing the project as a group rather than handing the job straight over to our Chief Editor Josh, so that we could all understand how to use the program effectively for our own individual job roles. When we were happy, Josh started to edit the video, relating to my Storyboards and Animatic on my Blog, while I started researching and experimenting with different effects such as the Super 8mm old film effect, using both the Internet as a search resource and Final Cut Pro for the experimenting with effects. Emily at this point tried her luck at designing and creating a CD DigiPak cover and Poster using Adobe Photoshop on the iMacs.

(ABOVE: JOSH'S EVALUATIVE DVD VIDEO VOICEOVER COMMENTARY)

Whilst it was principally Emily who created and designed the CD covers and Print Advertisements, I selected all the shots from the captured footage and organized them under headings – test footage and the outtakes. After compiling several shots, I successfully completed two complimentary videos for the Pop Promo if put onto a DVD disc – The Test Footage video, and The Outtakes (which lasted for around 15 minutes and included not only the Gag Reel but also Deleted Scenes and shots not used in the Pop Promo.

I wasn’t asked to actually physically create a DVD disc for the DigiPak package, but think about the Special Features to go on that disc. However, in my spare time, I went one step further - I actually created two or three fully-operational DVD discs for DVD Players, with videos and extras as well on the Special Features menu, using DVD Studio Pro, to see how I could utilize my technological skills. I made improvements such as Menu functionality and numbers of options to select, and fixed a problem where, when one video had finished, the DVD Player had assumed the DVD had finished. I fixed this by programming each video or Special Feature to jump back to the menu at the end of playback. I also included a few image slideshows – storyboard images, production images, and post-production images.

On top of these computer programs, I used a free download of a "powerpoint to video converter" utility program to upload one or two PowerPoint Presentations onto my Blog. One of the conversions is above, under 'Question Two'.

As part of the finalising of the Project and Evaluative stages, we each constructed a video commentary to be placed on top of the video as an audio file. The order of the videos is as follows: Chris Kenworthy (Director & Cameraman) - ABOVE, Josh Payne (Chief Editor) - ABOVE, Emily Swager (Art Director) - BELOW.

Friday 30 April 2010

Wednesday 31 March 2010

Final Print Advertisement Design

Above is the final (yes, final!!!) design for the DigiPak Print Advertisement. We have decided to use the tennis courts image used on the DigiPak front cover, which again is actually a screenshot taken from the main video, and edited and resized to fit the set layout for the DigiPak.

As on the Final DigiPak Design, we used red-coloured typeface to keep a running theme, and slightly changed the release date to add extra emphasis to this small, important piece of information. We added a couple of reviews, which we of course made up, to show that leading national newspapers and magazines had noticed the new release and to attract the potential audience of those newspapers and magazines (The Sun and The Sunday Times) to our CD DigiPak.

Final DigiPak Design

Above is the final (yes, final!!!) design for the CD DigiPak Covers. We have decided to use a 4-Sided layout, using an image of the "3 Ducks Parade" under the CD Placement Holder, and n image of a seagull flying with the backdrop of the sky at Ipswich Waterfront, for the inside of the DigiPak. Outside, we have decided to use an image of the two characters in the tennis courts as the front cover, and the establishing shot of our video as the back cover, where the trck listing has been placed. All images are actually screenshots of the main video, taken from the video file itself, and edited and resized to fit the set layout for the DigiPak.

DigiPak: Print Advertisement Ideas

On my PC at home, I studied different typefaces and fonts, stylistics, images, colours and layouts. Below are two of the initial ideas I had using the computer program 'Microsoft Publisher 2003'. At the bottom, i.e. the thrid picture, displays my ideas for typefaces to be used.

I showed these to Emily at our most recent Group Production Meeting. Unfortunately, Josh was absent and so the finalising of group ideas was left to Emily and me. She said she liked thf typeface used in the two designs, which was actually called "AR Darling".

5 Years Time: The Final Edit (Compressed)

Friday 19 March 2010

SECOND EDIT: Issues

After completing what we think was our almost-ready final edit last Friday (12th March 2010), we showed the Second Edit (EDIT 2) to our Media Studies lecturer Jon. It was useful to show it to him as he gave us some more feedback about the video. He agreed that we had put a lot of work into the video, and said that now it just needs 'polishing up'.


He was unsure of the storyline at the end of the video, where I am lying in the road. Initially, in the script, this is the point at which we show the girl has died and the boy lies in the road where she died in a road accident, but Jon could not get the gist of this and was a little uncertain about the real meaning of the final shots. He advised us that we should remove a couple of the transitions as they still seemed to show that a student had been editing here and added a few transitions just for fun.

Otherwise, he said we needed a few more dissolves here and there to ease the cuts between two or more of the shots. He also pointed out that we may need to reconsider the styles and the positioning of titles in the video. The introductory titles may need to be at the very beginning, and possibly some titles at the very end to say our names, i.e. "Director: Chris, Producer: Josh" etc.


Josh Payne:
Next Editing Session

After receiving feedback from our tutor I decided to swap some of the shots around thus differing our narrative slightly. In the original version we first introduced the female character in flashback and then jumped forward to our main protagonist sulking in grief, however we now introduce him first and the girl at around 1 minute. I believe that this allows the audience to understand the storyline more effectively as they can see the despondency of the main character and know that he has lost his 'love.' As well as that I was concerned about our allegro instrumental sections due to the fact that at first we simply had shots of the characters observing ducks in the pond. Therefore I moved the 'duck' shots to take place as part of the scene setting and had the instrumental sections contain Emily running (to demonstrate the upbeat music).

Also I decided that the opening forty seconds felt a touch slow so I experimented with the addition of 'titles' and found that this worked fairly well and the band had also used titles in some of their own pop promos. Most importantly I added the super-8mm film effects by using in built functions on Final Cut Pro including 'bad film' and 'colour balance' to all the shots where the 'girl' was in shot.

Thursday 18 March 2010

DigiPak Ideas: Contents and Features

Whilst Josh (Chief Editor) has been editing and finalising the Music Video which we have created (Pop Promo Edit 2), and Emily has been creating and designing the CD Covers for the DigiPak, I have made an Outtakes video (Pop Promo Outtakes), scanned the Storyboards (Storyboards) and then compiled Storyboard images into an Animatic (Animatic). I have yet to compile all the test footage that we captured and post that video on this Blog (which I shall aim to do tomorrow).

Following a class discussion, I had a few ideas about what our DigiPak should contain. As a class we agreed the DigiPak/CD Covers should contain:

  • Band, Song and Record Label logos
  • Titles - Band, song/album name
  • Track listing
  • Copyright Protection logos and information (©, ®, ™)
  • Barcode & Price
  • DVD details - age certification or 'Parental Advisory: Explicit Content' label
  • Pictures - front, back, middle (inside and outside)
  • 4-Sided with 2 Spines- 2 pics outside (front/back covers), possibly 2 inside
  • 6-Sided with 3 Spines- 3 pics outside (front, middle, back covers), 2 inside, with Production pics or a "Production & Artwork" booklet
  • Collector items
  • Competition entry forms
  • Limited Edition - 'Exclusive DVD included', 'Bonus tracks', or 'uncut version'.
Then, as a class, we also discussed the Contents and Features to be included on the DVD in the DigiPak, depending on whether we had a DVD in the DigiPak or not. We agreed the DVD should showcase the artist. Below is the set layout for a 4-Sided DigiPak:

After the class discussion, I had a few of my own ideas. I thought the DVD itself should contain an interactive DVD menu, which could be on the CD and be one of those discs where you play the music in a CD Player but use it as a DVD in a DVD Player or Computer. Or, the DVD could be a separate disc from the CD, maybe forcing us into designing a 6-Sided DigiPak, and the DVD when inserted into a DVD Player comes up with the Interactive menu where viewers select an option from a list (Play All, Pop Promo, Special Features).

In terms of Special Features, I thought maybe adding the Storyboards to be viewed individually or as a Slideshow, and a few "making of" videos, such as:

  • test footage
  • animatic (could be incorporated into the 'Storyboards' menu option in the 'Special Features' menu)
  • outtakes and bloopers
  • video documentary or interviews
  • music video (pop promo) itself.
I will look into creating a proper, working DVD disc with the iMacs, as I have seen an instruction booklet in our Editing Suite referring to how to make a fully operational DVD. The one question I want answered is 'Will I be able to create a fully operational, interactive DVD menu?'

Wednesday 17 March 2010

POP PROMO: DigiPak DVD Extras: Outtakes Video

On my YouTube Channel:

Part 1 / Part 2 / Part 3 / Test Footage.

Tuesday 16 March 2010

SECOND EDIT

After creating our 'first edit', we showed it to Jon, our lecturer, for some feedback. Initially he said it was coming along nicely, but needed a bit more Video Effects to be added to the Flashback shots, more Close-up shots on me and my character to show 'Ownership of Flashbacks', more Close-up shots on Emily and her character and more Close-ups and shots in general of the two characters interacting with each other or interacting with camera. He suggested the edited cuts and transitions between shots in the introduction should be in sync with the music, in other words 'cut to music' to establish the relationship between the music and visuals, and suggested we cut down on the number of different transitions used (consistency and continuity, or Match-On-Action), as it generally looked like a 'Students' Botch-up job of making a video'.

He did, however, like the way in which we stepped away from each other (Emily and I) in the tennis courts whilst throwing a tennis ball to and fro, a metaphorical way of showing the growing distancing between the two characters in terms of their relationship.

Finished on Friday 12th March (2010) and including the proposed 'Super 8mm Effect' (I think the flashback shots should be slowed down more to give more of an older feel to these particular shots), this is the Second Edit (below), though I must warn you that it's not the final version!

Thursday 11 March 2010

DigiPak: CD Cover Designs using PhotoShop

Today we used the iMacs again, but this time we were given an introduction to the iMac computer programme PhotoShop. We will use this to eventually design the final copy of our decided Group CD Cover. We were given the task of, well, fiddling around with the programme to see what each button does and how creative we can be with PhotoShop. I designed the CD Cover below.

It contains elements which I thought were both useful and descriptive of our Video.

Wednesday 3 March 2010

Emily and Josh's Ideas for The Promotional Package (CD Album Cover)

THE IMAGE BELOW IS THE IMAGE WE HOPE TO USE ON

OUR FINAL CD/DVD DIGIPAK DESIGNS!!


EMILY SWAGER'S INITIAL DESIGN FOR CD/DVD DIGIPAK COVER:

JOSHUA PAYNE'S INITIAL DESIGNS FOR CD/DVD DIGIPAK COVER:

Monday 22 February 2010

The Promotional Package (CD Album Cover) Ideas

As I had researched Noah and the Whale's earlier CD Covers and Promotional (Marketing) Campaigns, I had a few ideas floating around about how our CD Covers and Posters should look like. First I hand-sketched and coloured a few sketches.

Instead of photocopying or scanning them onto the computer, I drew them onto my computer with the use of a special wireless drawing tablet and pen. The results, as you will find below, roughly demonstrate the thoughts behind colouring, typefaces, and positioning of titles and pictures.

The final drawing wasn't one of the original sketches. I tried to replicate the "Welcome to Las Vegas" signpost for the title of the song (5 Years Time), and in all sketches tried to relate the band's name to the band's logo, as seen on the front cover of the album Peaceful, the World Lays me Down.

The sketches and drawings aren't accurate, or indeed drawn to a specific size and shape, therefore I chose to upload these ideas onto this Blog for future reference.

Sketch 1:

Sketch 2:


Sketch 3:

Sketch 4:


Sketch 5:

Friday 5 February 2010

FIRST EDIT

This is the first edited version of our Music Promotional Video. It hasn't yet had the 'Super 8mm Effect' added. This is basically a rough version of what we thought it would look like when viewing my Animatic version, but also shows our progress from Day One to what we have now.

Log, Capture and First Edit

Today we managed to sort out the problem we had last Friday with logging and capturing our footage. There was one minor hiccup, where we started to record instead of playback our footage, but we only lost a couple of seconds of footage which wasn't that important anyway.

After logging and capturing the footage, Josh started to piece together all the shots in a timeline in Final Cut Pro, whilst I continued my research into the aged-film "Super 8mm" Film Effect using both the internet and Final Cut Pro to experiment with different effects. Emily, meanwhile, continued to develop her own individual ideas for the Digipack (CD Cover) and Poster.

I exported the first edit from Final Cut Pro into a ".mov" file. The cuts and transitions are not yet perfect, as this is like a first draft of the project so far. Therefore, don't expect to see perfection. I have uploaded the file to my YouTube Channel, and will soon upload it here once I have compressed the file to a smaller size.
The photographs above are screenshots I made of the handheld shot which rotates 360 degrees in a circle - we used this shot in our editing.

Friday 29 January 2010

Filming: On-Location

Today, (thank God!), we were able to shoot and film the remaining footage which we needed to complete the process of filming our Music Promotional Video. This consisted of the flashback shots, which we will apply the "Super 8mm" (or aged-film) film effect to during the editing of our footage.

We had headed off to Christchurch Park and the tennis courts once again in hope of succeeding, and although a fine drizzle of rain started it didn't stop us from filming. When finished in the park, we walked over to the Waterfront and filmed the shots we needed in this location.

Unfortunately, (and this a big disadvantage to us), Emily Halls, the actress who was supposed to be in our video, was unavailable at the time to star in the video due to her attendance in another lecture. Therefore, Emily Swager, our Art Director, stepped-in as the female character. Fortunately for us, we always have a backup plan!!

Next week, we hope to log, capture and edit the remaining footage, and hopefully the process of editing will be completed before February Half Term (starts 12th Feb 2010).

The next task we aim to accomplish is the designing of an Album Cover and also a Poster advertising the Album CD. These tasks come under the "Digipack" task. There are two possible methods which we could use in order to succeed at this task. First, we could go out to our locations with a Digital Camera, take some photographs in these locations (possibly with the characters from our video) and select one or two of the photographs as possibilities to use as the Album cover and Poster. Or, we could draw then scan onto the computers a hand-drawing, or create a drawing on the computer using a drawing tablet and software.

Friday 22 January 2010

Our Unfortunate Tale of Bad Luck Continues...

Again, misfortune has struck us with a slap in the face. The weather today is appalling - it's dark, wet and cold (miserable weather). I'm now starting to learn how Film Production crews manage in the real world - if the weather is appalling, film in an interior location until the weather is okay and suitable for filming.

The problem with the rain is not only will it take away the "summery" feel of the flashback shots, but also that it will be hard to keep the camera dry (YES! It is a piece of electrical equipment) as we have no umbrella and our Art Director Emily Swager had come to College slightly disorganized today as she wasn't wearing any costumes, but then neither was I!

We have rearranged the shooting of the new footage to next week (Thursday or Friday - whenever is possible), and hopefully if our actress Emily Halls is available then, then we can use her in our video as originally planned.

Thursday 21 January 2010

Hopeful Planning Prior to Filming On-Location

Tomorrow, we aim to complete our music video and film the remaining shots which we had planned to film before Christmas and are now taking action to ensure the successful completion of the once unsuccessful task. I now have two Mini-DV Tapes for filming - the original one which we could not recover before Christmas, and a new one our Media lecturer has supplied us with in case we cannot recover the original for some reason, so that in all cases we are covered and have some form of recording medium. Therefore, we hope we can film the rest of the footage tomorrow morning, yet we are unable to use our actress so Emily Swager (Art Director from our production crew) has agreed to play Emily Halls' part in tomorrow's filming, where I shall be using handheld camera shots by the Waterfront and in Christchurch Park for the flashbacks and shooting some peformance shots in case we need them (IF THE WEATHER IS OKAY AND THERE ARE NO PROBLEMS - TOUCH WOOD THERE WON'T BE!!).

Friday 15 January 2010

Editing, Logging and Capturing

Today, as part of a normal group production meeting, we started the editing of our existing footage in our editing suite using Final Cut Pro. We recovered our Mini DV Tape, and were given another tape to keep in case we cannot recover the original Mini DV Tape in future circumstances, for intance next week when we are planning to complete our pop promo by filming the handheld shots to be used in the flashbacks with the "Super 8mm" aged-film effect.
Also today, after recovering our Tape (recording medium) we captured and logged the shots which we had managed to film before the Christmas holiday period. We logged and captured these shots so that we could use them in the editing of existing footage.
For the shots in the flashbacks where we anticipate using an aged film effect (Super 8mm effect), we were planning on filming with the camera but handheld, to give these shots more of a personal feel, and these shots will be the point-of-view from the character which I am playing.

Friday 8 January 2010

Filming: Another Setback!!

This time, it's the snow and ice. January 2010 hasn't brought us the weather we had expected. As Josh has politely put it on his Blog: "For the time being further heavy snowfall has made filming in our locations impossible so we are for the moment spending our time updating our blog and beginning to log, capture and edit our existing footage."

Thursday 7 January 2010

Research into the Super 8mm Film Effect

I found the above video on YouTube - it shows what should be the final jigsaw puzzle for the editing of our Music Promotional Video. As I have already researched, we intend to add a colour tint to the flashback shots of the Video, so that the viewer and potential audience can distinguish between the past and the present.

Wednesday 6 January 2010

Research into the Super 8mm Effect for use with Final Cut Pro

Although I am not Chief Editor, and Josh is, I might be working in cooperation with Josh as the Co-Editor. Therefore I have devoted some research into the "Super 8mm" Effect we had discussed about in Group Production Meetings and agreed to use if possible for the flashback elements of our Music Promotional Video for "5 Years Time" by Noah and the Whale.

I found the information below on: http://forums.creativecow.net/thread/8/918311, when someone had posted on this forum "Can anyone suggest the best way to emulate a super 8 or an aged film look in final cut pro?":
  • There are many plug-ins (Nattress is one) that simulate the effect. But if you want something cheap and free. Export the clip out of FCP using "Quicktime Conversion" Then, under Option-Filter-Special Effects, you can add some a film hair/dirt effect that's not too bad. Combine that with color correction in FCP and possibly some speed adjustment (Old 8mm always seems sped-up a bit) it might just work for free. Ernie Santella Santella Film/Video Productions http://www.santellaproductions.com/.


I also found the following useful information on this website: http://www.nattress.com/Solutions/solutions.htm#6:

  • I want to make my video look like film: The Film Effects package was designed for you! Whether you are using PAL, NTSC, or HDV (or HD or SD) Film Effects has settings which will make your video look much more filmic. Film Effects does 25p conversion for PAL frame rates and 24p conversion (with 3:2 pulldown added) for NTSC frame rates. It has over 20 presets and you can make your own. There are over 27 plugins, all designed for different aspects of making your video look filmic and can be used in combinations or separately. Film Effects also gives you immense control over the gamma and tone of your image, so it can be a great tool even when you're not trying to make your video look like film.
  • I want to make my video look like old Super-8 film: Film Effects has a preset called "Old Projector". This might be exactly what you're looking for, or you can use it as a starting point.

I found the following useful advice on: http://library.creativecow.net/articles/smith_stephen/film_look.php (ALL CREDIT TO THIS WEBSITE AND THANKS FOR THE ADVICE!! WE WILL CONSIDER THESE IDEAS AND HOPEFULLY THE RESULT WILL BE AS PLANNED!!)

1. Black & White or Sepia

Black & White

  • Select the desired clip in the time line.
  • Choose Effects > Video Filters > Color Correction > Color Corrector 3-Way.
  • Double click on your clip and then select the Color Corrector 3-way tab in the viewer. Drag the Sat (Saturation) slider tab to the far left.
  • Drag the Whites slider to the right and the Blacks slider to the left slightly, this will add more contrast to your clip and make it feel more dimensional.


Sepia

  • Select the desired clip in the time line.
  • Choose Effects > Video Filters > Image Control > Sepia.
  • Double click on your clip and then select the Filters tab in the viewer.
  • Change the highlight amount to give the clip a more realistic sepia color. I find 33 works well for a lot of clips but it does vary.
  • Click on the triangle in the Tint Color box and then adjust the S slider to give your clip a more faded look. I find 58 works well in a lot of situations.


Final Cut Pro Filters

2. Export Clip


This is where you get to add all of the visual effects that are associated with old or damaged film.

  • Mark in and out points on the timeline of the clip or clips you wish to give that old film look to.
  • Choose File > Export > Using Quick Time Conversion.
  • Give the clip a name, locate where you would like to place it and select what format would work best.
  • Click the Options button. In the video settings section select the Filter button.
  • Click on the triangle next to the text Special Effects. Then select Film Noise.


FCP Special Effects

  • Click on the Hairs button and change it to Scratches. Set Scratch Density to 0.
  • Adjust the Dust and Film Fading > Film Fading setting to None.
  • Change the Hairs settings and the Dust and Film Fading settings to your liking. I adjusted the Hairs > Hair Density to 48, while I bumped the Hair > Hair Length to 47.
  • Click Ok and then click Ok again in the Movie Settings box. Then click on the Save button.
  • When the clip is done exporting your in and out points remain on the timeline. Repeat steps A through D and then change the Scratches > Scratch Density from zero to around 6. Don’t worry about the scratches looking fake, that will be remedied in the next section.
  • Click Ok and then click Ok again in the Movie Settings box. Then click on the Save button.
3. Double Clips up


This section will take the edge off of the fake looking scratches.

  • Import the two clips and drag them into the timeline.
  • Place the clip with the scratches on top of the clip with out.
  • Drop the opacity of the top clip to about 30 percent.
4. Ad Flicker


This step adds that extra touch of believability to that old film look.

  • In the Viewer click on the A in the film strip.


Final Cut Pro Video

  • In the drop down menu drag the mouse to the word Matte. Then click on the word Color from the menu that pops out of the side.


Final Cut Pro Matte Color

  • In the Viewer select the Controls tab and then click on the gray box.
  • Change the color to black and hit OK.
  • Select the Video tab and then drag the matte to the track above your two clips in the Timeline.
  • Click on the Clip Overlays button on the Timeline and lower the clips’ opacity to 17.

FCP Clip Overlays

  • Select the pen tool from the Tool Pallet.
  • Add a keyframe to every four frames of the matte. Then drag every other keyframe to zero opacity.


FCP Matte Keyframes